The code for this article is available on GitHub: Well App

Tried all the basic examples and ready to build a “real” app? This article will take you to the next level. You’ll learn how to put together the pieces of a production app, so that it can handle large volumes of users. You’ll also be shown how to configure and deploy your app onto the EngineYard Node.js cloud.
The app in this example goes beyond traditional toy examples by delivering enough functionality to bring up real-world use-cases and coding challenges. It is still small enough to comprehend for learning purposes. In addition to this article the app source code is commented in a very detailed manner, so you should able to follow each line quite easily.
The other aspect of production deployment that this article covers is building a scalable app. This means building an app that can scale by adding new servers as required. The architecture used is the standard pattern: multiple web servers behind a load balancer. This architecture can get you quite far before you start needing to use advanced approaches. This article does not cover the dev-ops end of things, so caching proxies, deployment automation, and monitoring are out-of-scope. Rather, you’ll learn to put together the application-specific parts such as scalable sessions and in-memory caching.
This article takes you through the following areas:
- Running the example app locally in development and production modes
- Deploying and running the example app on the EngineYard cloud
- A code walkthrough of the front end and back end code
The app itself is a HTML5 mobile app, with a front-end built with Sencha Touch. The server-side of the app is built using the express Node.js module, which provides a web server framework, and the Seneca module, which provides a business logic framework. The app implements a simple networking app for meet-ups and conferences (we run a few of these, and it’s something we use ourselves as a fun Node.js app demo).
Here’s how you play: your team wins the game by getting the most points. You get points by connecting with the other people on your team. You connect by physically talking to the other people on your team — this is where the networking comes in. To prove that you have done this, each person gets assigned a playing card within the app, and you have to ask them for it. You then enter the card and connect with the person. This is called a “Well!” (in my home town, we say “Well!” instead of “Hi!”). The app is a HTML5 mobile web app as this is “the simplest thing that could possibly work”. Also, it’s kind of fun, as it gives you a conversation starter.
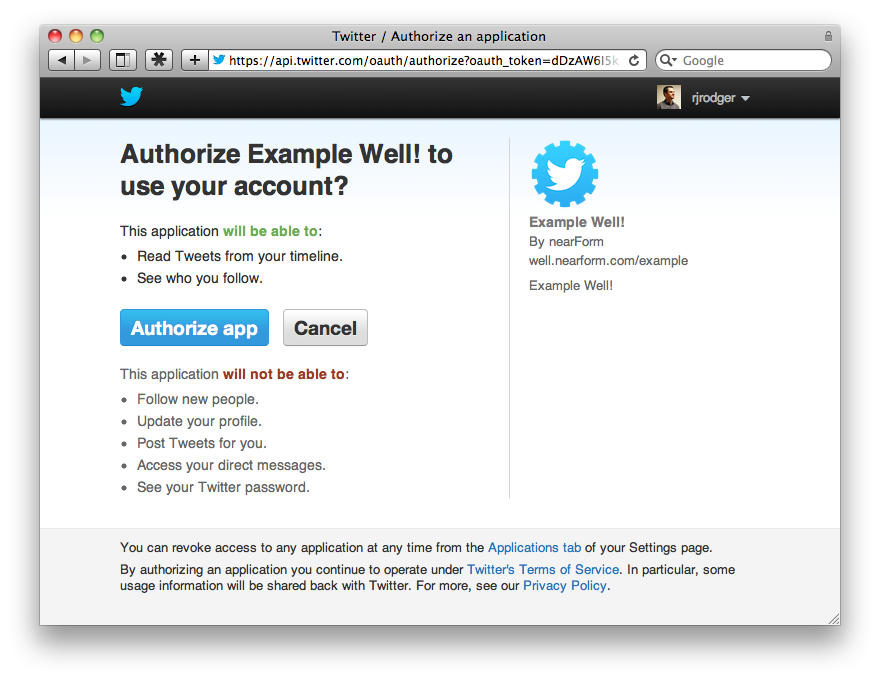
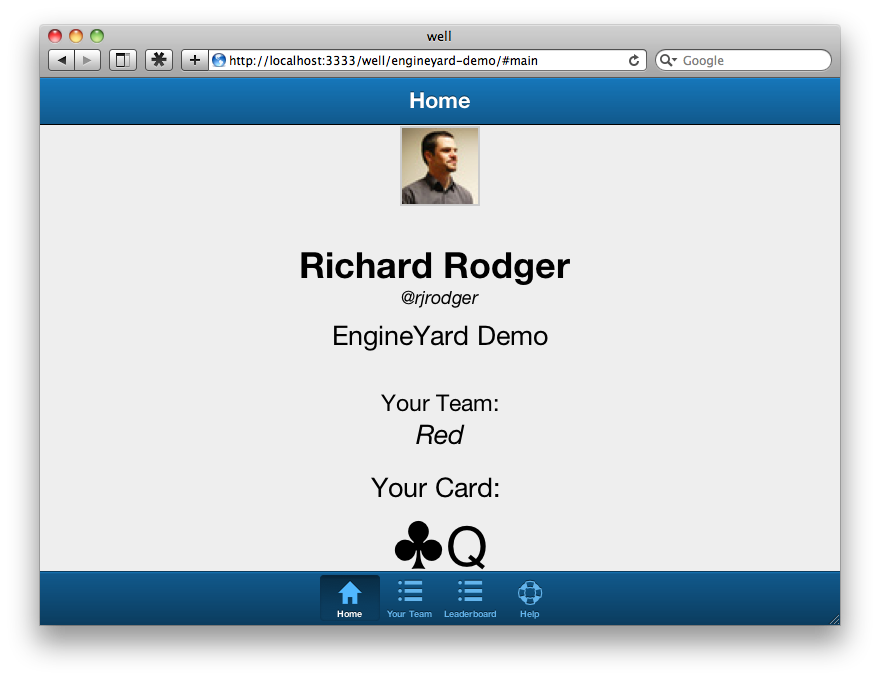
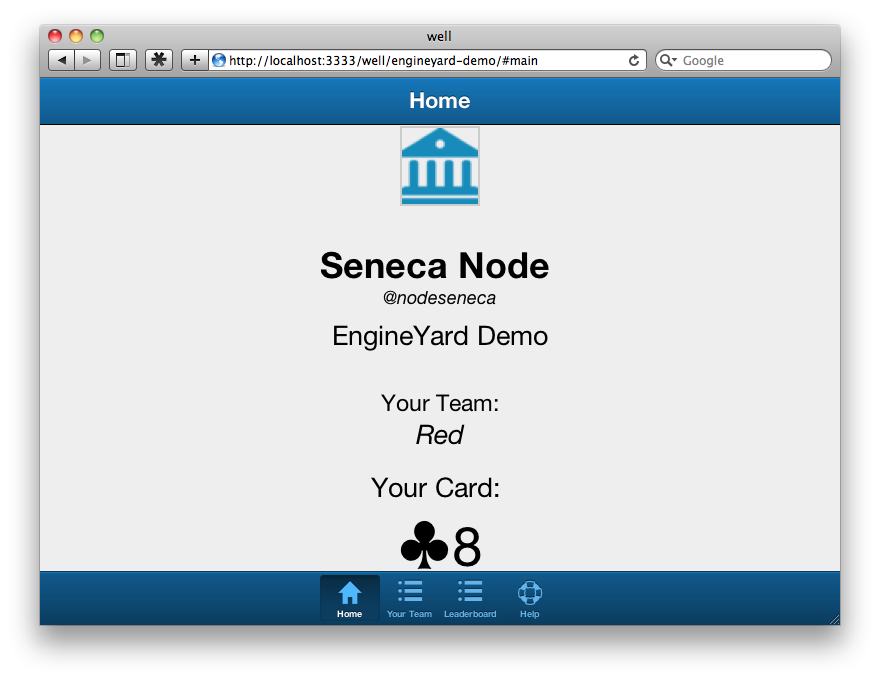
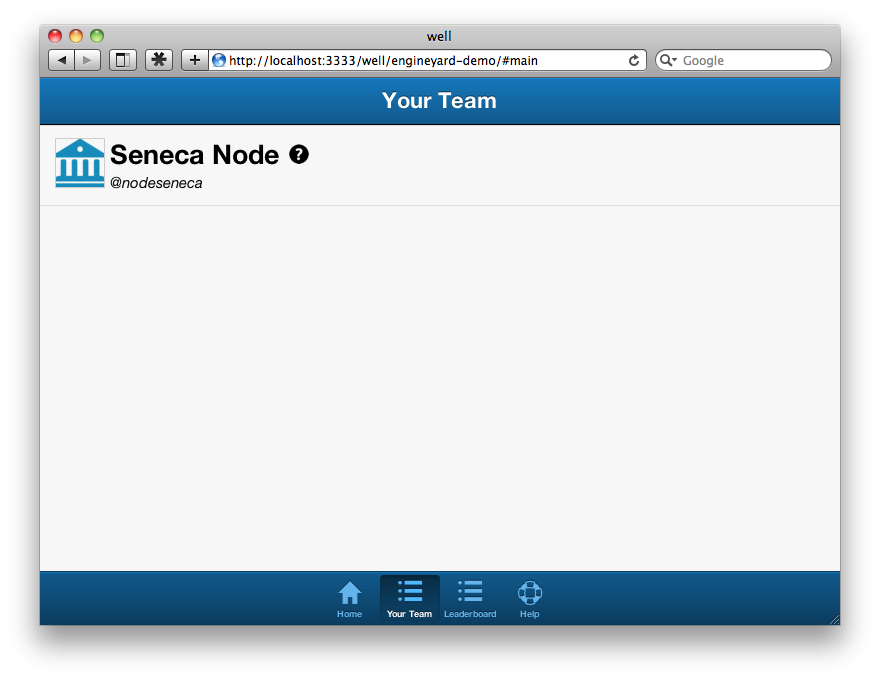
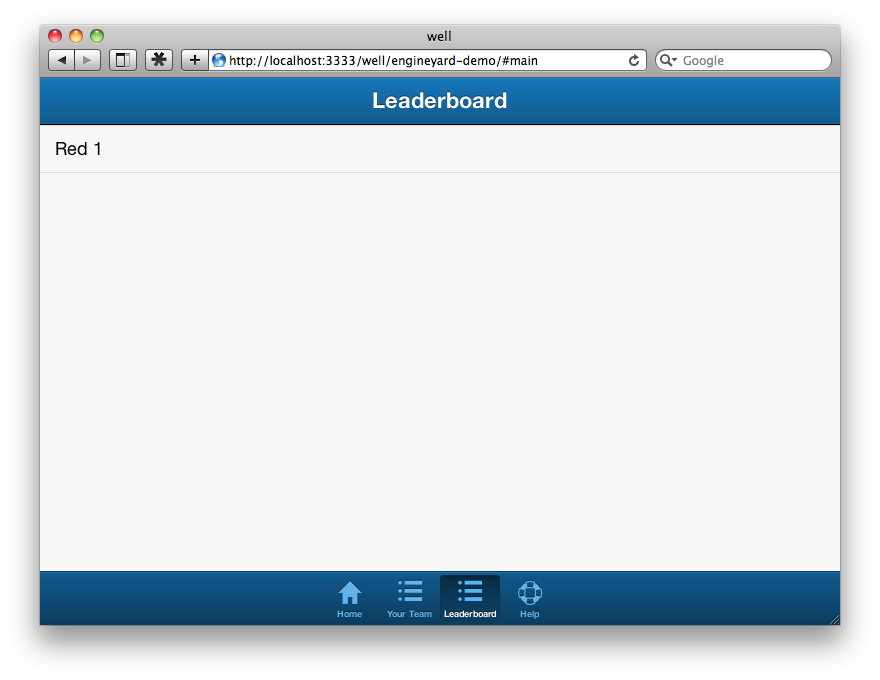
Here’s a sequence of screenshots showing you how it works. The app uses Twitter for login. First, user @rjrodger (that’s me) joins the EngineYardDemo event, and gets assigned to the Red team. Then user @nodeseneca joins, and also gets assigned to the Red team. Both users review their team mates, and then @rjrodger connects with @nodesencea by entering the eight of spades playing card, which @nodeseneca holds. They are now connected, and this is reflected in the leaderboard.
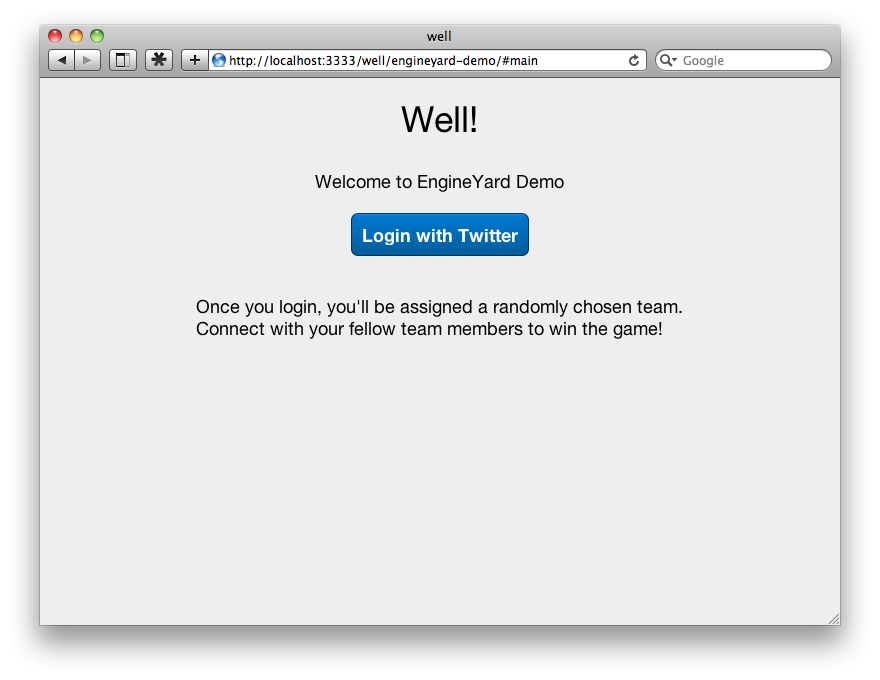
- Users open the home page for an event:
- User @rjrodger joins:
- User @nodeseneca joins:
- User @rjrodger sees @nodeseneca is also in team “Red”:
- User @rjrodger connects with @nodeseneca:

- The “Red” team now has 1 point:
The app is meant to provide you with a starting template for your own apps. It gives you a basic mobile app Sencha Touch interface (which could easily be replaced by your own choice of UI framework, such as, AngularJS, Backbone etc.), and a basic JSON REST API for the backend. The app code is available on GitHub, and is completely public domain, so feel free to copy!
Getting the App Running Locally
You’ll need to run the app locally to verify everything is in order and to test your settings. The app can run using Node.js version 0.8 or 0.10 — you should have one of these versions installed from nodejs.org. Here are the steps to get up and running:
- Clone the repository using git. You could also use your own fork. Use npm to install the modules that the app needs to run. $ git clone http://github.com/nearform/well $ cd well $ npm install
- Create your own configuration file. Open the app folder and copy the options.example.js file to options.well.js
You don’t need to make any changes just yet.
- Run the app in development mode. This mode has no external dependencies, and uses a throw-away in-memory database: $ node app.js –env=development
You should see output similar to
2013-06-23T20:27:31.828Z	INFO	hello	Seneca/0.5.8/vauuw1
2013-06-23T20:27:32.149Z INFO listen 3333- Open (in your web browser) the main page for the test event called MeetupA:
You’ll see a Login with Twitter button, but this won’t work just yet!
- Login with a fake user to test the app, by using the following URL:
http://localhost:3333/fake/u1/ma
This logs you into the MeetupA event (it has code “ma”), as user “u1”. You can use this URL format to log in to test events when in development mode. Don’t worry, this “feature” is not available in production mode!
- Make a note of your playing card as user u1 — this is on the user’s home page after login. Now login as user u2:
http://localhost:3333/fake/u2/ma
Click on the “Your Team” tab. You’ll see user u1 in your team (their name is “n1”). The event MeetupA only has one team, so everybody joins it. Click on the u1 user, and tap in their playing card to connect with them. Then check the leaderboard to see that the Red team has 1 point.
That’s pretty much the entire game dynamic.
- Open the data editor administration view using
http://localhost:3333/data-editor
You can browse around and view all the data in the system. If you restart the server, everything resets – this is only development mode.
Running in Production Mode Locally
The next step is to make sure everything still works when you run the app closer to the way it will run in production. The app has the following dependencies:
- Twitter Account: you’ll need to setup an app on dev.twitter.com.
- MongoDB: you’ll need to install and run this locally — download from mongodb.org
- Memcached: you’ll need to install and run this locally — download from memcached.org
The app uses Twitter for authentication as this is the quickest and easiest way to do it. Most people at meetups are tweeting anyway. Visit dev.twitter.com and login using your twitter account. Select the My Applications option from the dropdown menu on the top right, and create a new application. Once you’ve done this, you’ll find your “consumer” key and secret under the OAuth settings. You can use this Twitter app for local testing, and for the live deployment to EngineYard.
The app will use MongoDB for persistent storage in production. You won’t install your own MongoDb server on EngineYard. Instead, you’ll use the cloud hosted mongo service MongoHQ.com. Outsouring your database is a big productivity win, especially in the early days. Running your own database, tuning and configuring it, and making sure backups are working, is a huge time sink. For local development it makes more sense to have the database running on your development machine. The installation from mongodb.org is painless and cross-platform, so you should be up and running in no time.
The app will use memcached for in-memory caching of frequently used data. For development, it’s best to install locally. Memcached is easy to install and run and requires no configuration. EngineYard makes your life really simple by including memcached on your cloud servers, so you won’t have to do any work on the productions servers to use it.
Here are the steps to get up and running locally with a near-production system:
- Modify the options.well.js file, and enter your:
- Twitter app secret and key
- Local MongoDB connection details
- Local memcached connection details
- You’ll need to create an event to login to. Use the create-event.js script in the project folder to do this: $ node create-event.js –name Foo –code foo –numteams 1
This command creates an event called Foo, with URL code foo. You only create 1 team so that you can easily test the “Well!” action — everybody ends up on the same team.
This also serves as a smoke test to make sure the app can connect to the local MongoDB and memcached, as the create-event.js script uses the same configuration details.
- Verify the event has been created by issuing a query in the mongo command line client: $ mongo well db.event.find()
- Now run the app in production mode, with full debug logging: $ node app.js –seneca.log.all
This time, there’s no --env=development argument, but there is a --seneca.log.all argument, which instructs the Seneca module to log everything. And I mean, everything. This is just to give you a flavor for the type of logging information you can (selectively) obtain from Seneca — see senecajs.org/logging.html for more
- Login using a Twitter account. Visit: http://localhost:3333/well/foo Then login using another Twitter account (you’re a developer, I know you have more than one…). Confirm that you can connect as before.
- Use the data editor to review the database:
http://localhost:3333/data-editor
- Stop the app, and restart. This time, your data does not disappear. It is stored in Mongo.
Running the app on EngineYard
Once you have your app ready to deploy to production, you can use EngineYard to get all the benefits of cloud deployment. Specifically, EngineYard lets you scale your app by adding multiple instances of behind a load balancer. This is why it’s important to build your app so that it can scale linearly.
First, go to engineyard.com and sign up for an account. Then create a new Node.js application:
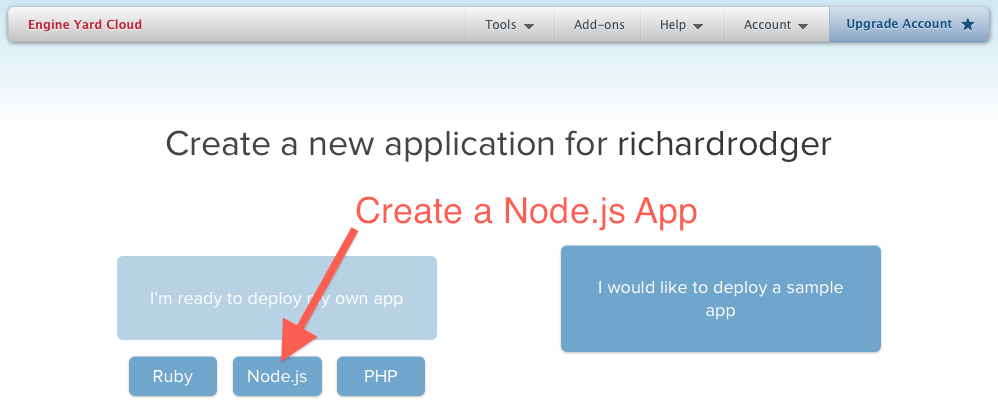
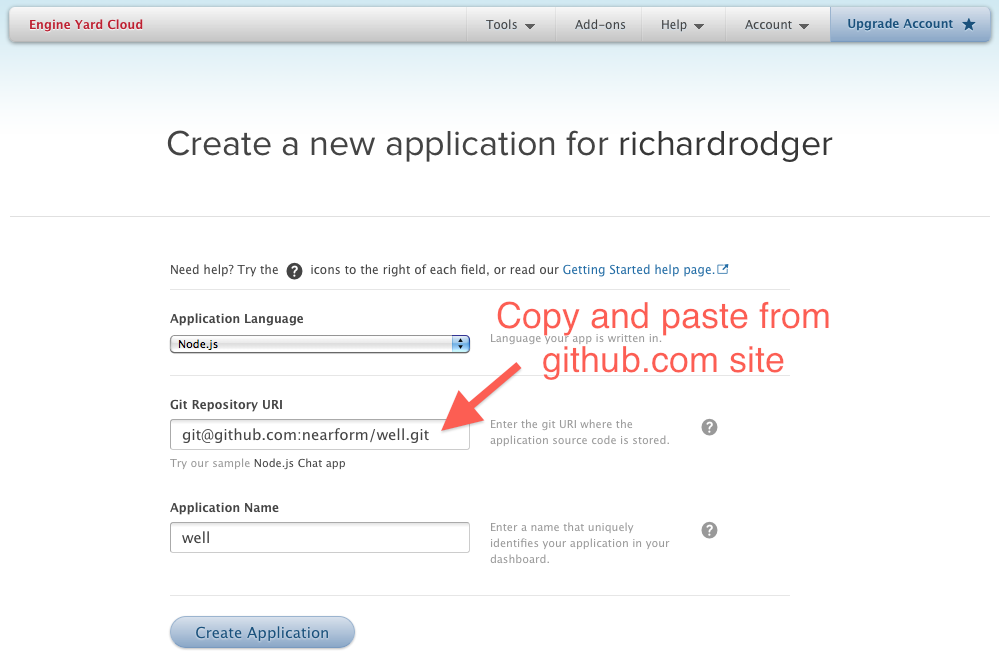
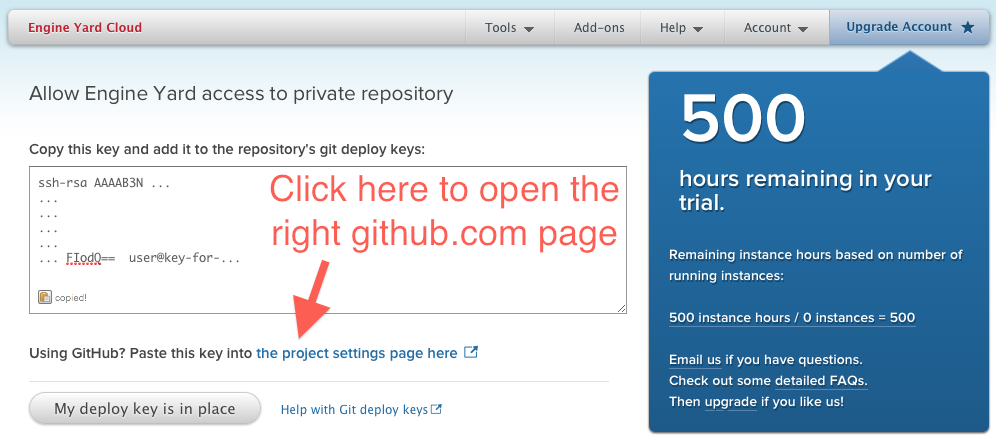
You’ll be asked for the basic details of your application. You’ll need to store your source code on GitHub, as EngineYard pulls the code from there. This works for both public and private repositories, as EngineYard uses GitHub deploy keys to access the code.
You get 500 free server instance hours when you create a new EngineYard account. This gives you plenty of time to get your head around how things work. If you follow this article you’ll use up around 10 of your free hours (and probably even less). There’ll be plenty left over for your own projects. Just don’t forget to turn off the instances when you are finished experimenting each day, otherwise you’ll burn hours for nothing.
After you click “Create Application”, EngineYard will generate a deploy key for GitHub, and ask you to paste this into the relevant form on the github.com site:
Once you have the deploy key in place, EngineYard will ask you for some more details about the deployment configuration of your app. Enter the fields as shown in the screenshot below. You’ll be using the mongohq.com service for your database, so you won’t need to configure an SQL database — select No Database for this option.
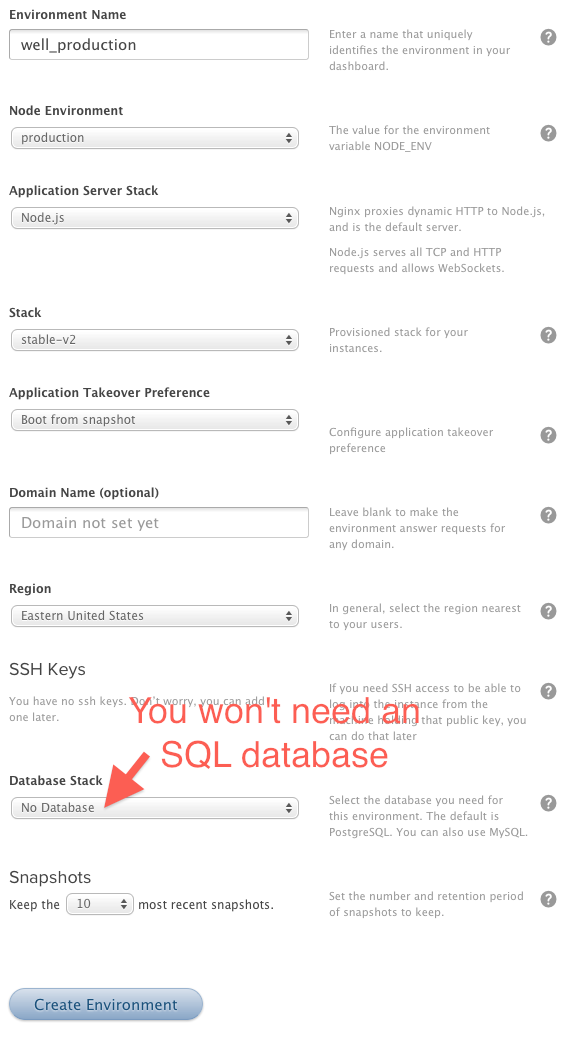
You’ll need to configure the number of servers you want to use for your application. For the example app, you only want two servers. This is enough to validate that requests are load balanced, and that the servers can work together in a scalable way.
The servers will come with Node.js pre-installed (version 0.8 at the time writing), and also memcached instances, so you don’t have to configure or install anything else apart from your own app. The memcached servers are essential as they provide your production apps with in-memory caching of frequently used data, reducing load on the database. In the case of the example app in this article, this is even more important, as you will be using an external database provider, mongohq.com. The Seneca memcached plugin uses the Node.js memcached module, which supports distributing your cache over multiple memcached servers. You have two, so this will work nicely!
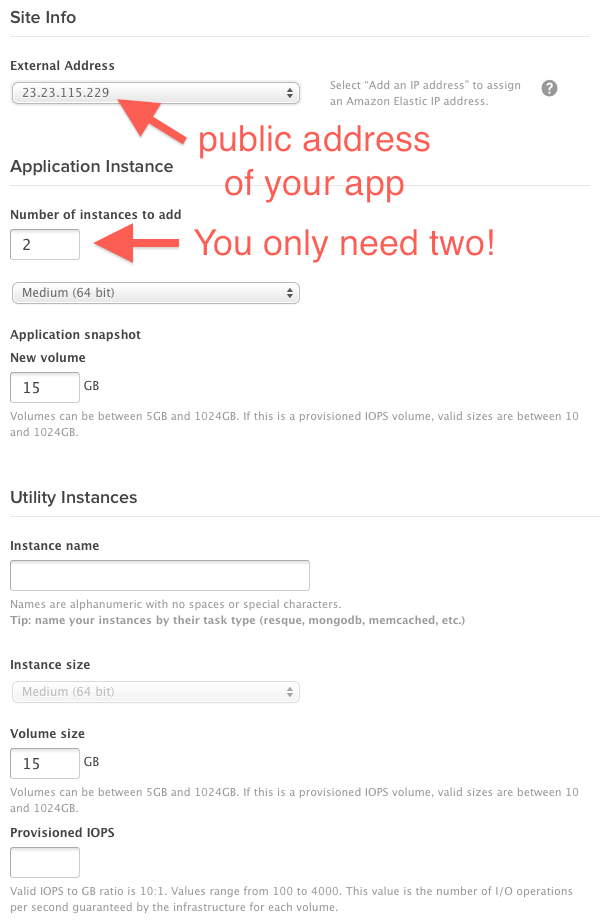
One final thing to do on EngineYard is to add your SSH public key to the configuration, as shown below. This lets you login to your servers using SSH or PuTTY LINK. Follow the EngineYard documentation if you need help creating an SSH key.
The app needs a MongoDB database to run in production. Rather than installing and configuring your own one, it is much easier to just use a cloud-based service. Create an account on MongoHQ.com, and you can get a small, low-performance, but free, database. This is good enough for our purposes here. You can always upgrade to a paid account with MongoHQ.com if you decide to use them in production.
Choose the Sandbox option for your database:
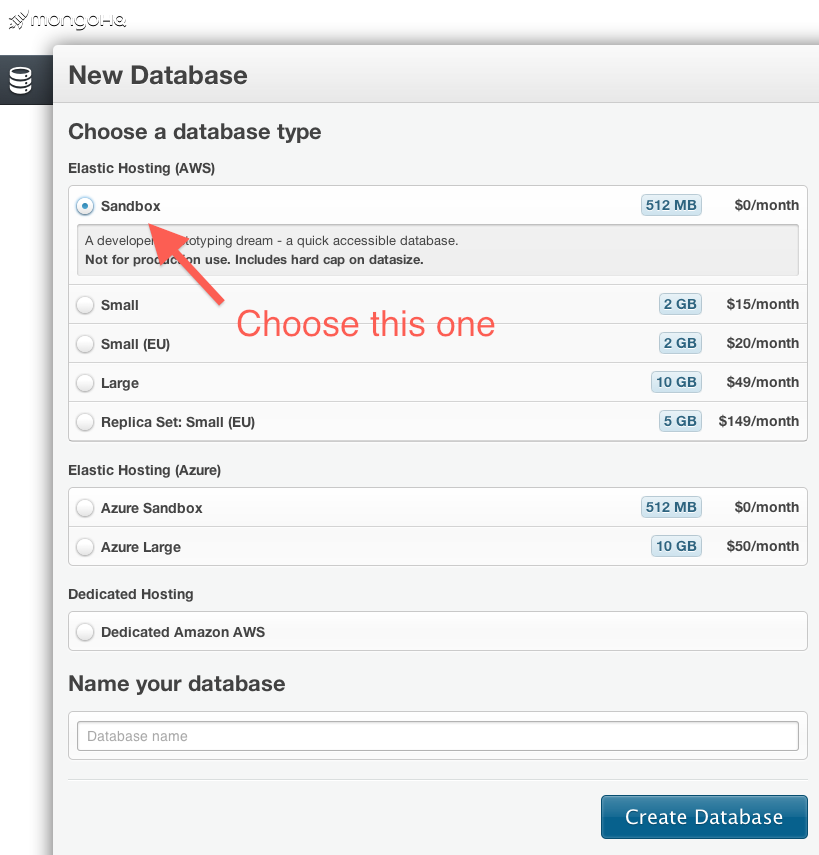
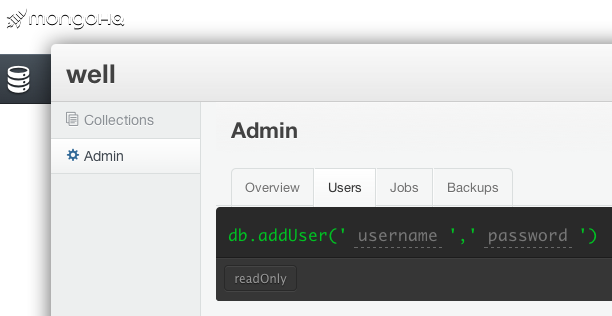
Once your database is created, you’ll need to define a database username and password for your database connection. Click the Admin tab, and then select the Users sub-tab. Enter ‘well’ for the name of the database user, and enter a reasonably secure password. Note the username and password down. You’ll need them for the app configuration file.
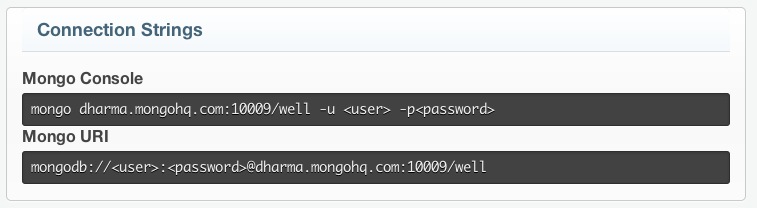
You’ll also need the database hostname and port number. Click on the Overview tab to see these:
For information on the MongoHQ service, visit the MongoHQ.com site.
Configuring the app on EngineYard.
Now that you have everything in place, start up the servers on EngineYard. It will take a few minutes for them to be provisioned. It’s a good time to grab some coffee.
Once the servers are up, EngineYard will pull down your code from GitHub and try to run it. Your app won’t run correctly because it is not yet configured. You’ll need to login to both servers, and setup the configuration file.
Also, before you can run your app in production, you’ll need to setup the database. Modify your local configuration (in the options.well.js file) to use the MongoHQ.com database connection details. Run the create-event.js script again to create the test Foo event on the MongoHQ.com database:
$ node create-event.js --name Foo --code foo --numteams 1This again also serves as a test to make sure you can connect to MongoHQ.com.
You can use the MongoHQ.com interface to verify that the database collections have been setup correctly.
Now you need to configure your servers:
- ssh into your servers. Get the public domain names from the EngineYard dashboard. The links are provided under the list of application instances on the environment panel. The ssh command will be: ssh -l deploy -A ec2-AAA-BBB-CCC-DDD.compute-1.amazonaws.com
where AAA.BBB.CCC.DDD is the public IP address of your server.
- Login to each server, and find its internal IP address. This is pretty simple — it’s given to you by the command line prompt: deploy@ip-aaa-bbb-ccc-ddd ~ $
This means the internal address is aaa.bbb.ccc.ddd. Make a note of the internal address for each server.
- Complete the following steps 4-9 for the Application Master server only (one of the servers is the “Application Master” – the EngineYard dashboard will show this).
- Create the options.well.js file, by copying and modifying the example file (included in the source code): $ cp /data/well/current/options.example.js /home/deploy/options.well.js
You can see from this command that EngineYard deploys your live application source code to /data/well/current. This folder is newly created for each deployment, so you can’t put your configuration file in here. Instead, you’ll just use your home folder /home/deploy.
- Edit the configuration file. It’s just a Node.js module, which means it is plain JavaScript code that exports an object with configuration properties. $ nano options.well.js
(The nano and vim text editors are pre-installed on the EngineYard machines. EngineYard uses Gentoo distributions, so run sudo emerge app-editors/emacs if you want emacs)
- Insert your MongoHQ credentials in the mongo-store sub property: ‘mongo-store’:{ user:’well’, pass:’YOUR_PASSWORD’, host:’MONGOHQ_HOST.mongohq.com’, port:MONGOHQ_PORT, name:’well’ },
- Insert the internal IP addresses for memcached: memcached:{ servers:[‘a1.b1.c1.d1:11211’,’a2.b2.c2.d2:11211’] },
Keep the IP addresses in the same order on both servers. EngineYard binds the memcached instances to the standard port 11211 on each server. You use the internal IP addresses as this is both faster, and the memcached port is not firewalled on the internal network.
- Insert your Twitter callback details, key and secret: auth: { … service: { twitter: { urlhost:’http://ec2-AAA-BBB-CCC-DDD.compute-1.amazonaws.com’, key: ‘w6 … IA’, secret: ‘Ap … 14’ } } },
The urlhost property is used for the Twitter callback. Use the public domain name of your server. This is the public domain name of the Application Master server.
- Insert your own admin password: well:{ admin: { pass:’YOUR_ADMIN_PASSWORD’ },
Choose a reasonably secure password. You’ll use this login to the data editor.
- Login to the other application server (not the Application Master). Copy the configuration file across: $ scp deploy@aaa.bbb.ccc.ddd:/data/well/current/options.well.js .
Where aaa.bbb.ccc.ddd is the internal IP address of the Application Master server.
- On both servers, kill the running node process. EngineYard will detect that it has died, and restart it for you. Your app should now work, as the configuration has been setup. $ sudo killall node
- To check that Node is working, look at the log files: $ cat /data/well/shared/log/node.log
Or to see entries as they are inserted:
$ tail -f /data/well/shared/log/node.logYou should see the similar output as on your local machine:
2013-06-23T20:27:31.828Z	INFO	hello	Seneca/0.5.8/vauuw1
2013-06-23T20:27:32.149Z	INFO	listen	3333
If there are errors, you’ll need to verify your configuration. Alternatively feel free to tweet me @rjrodger and I will try to help (sleep schedule permitting!).
- Your app will be available live at the Application Master public domain name. Try logging in with Twitter to the Foo event: http://ec2-AAA-BBB-CCC-DDD.compute-1.amazonaws.com/well/foo
Look at the log files on both servers. You’ll see requests going into to each as the EngineYard system load balances between your servers. To increase capacity, just add more servers!
- To access the data editor, login using a URL of the form: http://ec2-AAA-BBB-CCC-DDD.compute-1.amazonaws.com/auth/login?username=admin&password=YOUR_ADMIN_PASSWORD&redirect=true&win=/data-editor
This, obviously, is horribly insecure, as the URL will get logged. In a real production scenario, you would make one of your users an administrator (by adding the property admin:true to their sys_user collection entry).
Understanding the Code Base
This article provides a broad overview of the code base of the app. The code itself is commented at a very fine-grained level, so you should be able to understand every line of code without much head-scratching.
The server is organized as a standard Node.js app. The top level folder structure is shown below:
The main elements are as follows:
- app.js: sets everything up and launches the web server
- well.js: the main body of the app
- create-event.js: a utility script that creates new events
- package.js: the Node.js package file, defining the external modules the app depends on
- front: the Sencha Touch user interface files
Understanding the Code Base: The Sencha Touch files
There is nothing particularly remarkable about the front-end of the app. It’s a simple mobile web-app after all. If you already know Sencha Touch, you recognize that the front-end architecture is simply an extension of the Presidents example code.
If you do not know Sencha Touch, the bottom line is that it is a powerful tool for building “standard” mobile web-app user interfaces, such as those with tab bars, and page transitions. This power comes at a price — the learning curve is pretty steep. Sencha Touch is best learnt by copying examples, and this app is, in part, an example Sencha Touch app that you can re-use. If you have worked with any variant of the Model-View-Controller pattern before, you’ll be able to get the hang of it quickly enough (with lots of help from stackoverflow.
The other reason for choosing Sencha Touch for the user interface is to be true to the aim of presenting a “real-world” app rather than a toy example. Sencha Touch thus introduces an appropriate level of complexity, and shows you how things would work when building real apps for paying customers. That said, there is nothing inherent in the choice of front-end framework with respect to the main aim of deploying a Node.js app to production, and the HTTP REST interface exposed by the app is easily used by any framework. Which, indeed, is the very reason for building the REST interface in the first place.
With these thoughts in mind, the overview of the user interface will be short and sweet. Refer to the Sencha Touch documentation and examples if you want to go deeper.
The source files for the interface are the front/app.js file, which launches the app in the browser, and the files under front/app, that define the models, views and controllers. The front/app.js file sets up the front end configuration and defines a few utility functions. The most interesting part is the specification of the initial View (and the Controller) to execute:
launch: function() {
  Ext.Viewport.add([
    { xtype: 'welllogin' },
  ])
The xtype is Sencha’s generic reference code for user interface components. In this case, you have defined a View in app/view/Login.js that corresponds to the welllogin xtype. If you load up app/view/Login.js, you’ll see that it is basically a JSON document that defines the appearance of the login page in a declarative manner. You normally avoid putting much logic into Sencha Views.
The app/controller/Login.js file is far more interesting, being the Controller for the login View. The functions in this file define behavior in response to some user action. The config section at the top maps these events to the functions.
There are also “routes”. These are events that are triggered when a matching URL is shown. In the case of the login view, you want to know when the “/#main” route is shown, so you can call the whoami action to see if you are logged in. The whoami function in the Controller shows how to make this call via a HTTP request to the server:
Ext.Ajax.request({
  url:'/well/'+window.app.eventcode+'/whoami',
  success: function (response) {
    var resobj = Ext.JSON.decode(response.responseText);
This is the standard approach for making requests to the REST API exposed by the app, and you’ll see the same code pattern in the other controllers. The rest of the login controller is mundane code to set up user interface elements to the correct state.
Sencha Views can be entire pages, parts of pages, or single elements within a page. You’ll find the rest of the controllers in the app/view folder. They are all declarative user interface definitions that you should find easy enough to map the appearance of the user interface. There is no app logic in the views.
The app has three controllers. The login Controller you’ve already seen. The app/controller/Connect.js Controller is focused on handling the workflow of entering a team mates playing card, and then attempting to perform a “Well!” connection. The heart of it comes down to:
Ext.Ajax.request({
  url:'/well/'+app.event.code+'/player/well/'+other+'/'+card,
  method:'POST',
The app/controller/Main.js controller looks after loading the right data when a page transition occurs. The pattern is pretty much always to execute a HTTP request back to the app API, and then to populate a Model.
Models are the last piece of the Sencha puzzle — you need to place your data into Models so that it can be used easily by Views. Don’t try to fight this, it’s the Sencha way.
If you are not using Sencha, you can pretty much pull out the API requests and reuse them in the appropriate place in your own app.
Understanding the Code Base: the Seneca framework
The Sencha framework organizes your code on the front end. The Seneca framework does the same thing on the back end. Seneca works by dividing the app into discrete pieces of business logic, called actions. You can then expose these actions via a web API, customize them, log and observe their execution, and control access to them.
For the Well app, the actions are as follows:
- createevent: create a new event
- joinevent: join an event
- whoami: load current user details
- well: connect with a team mate
- leader: load leaderboard of teams for an event
- members: list the users in a team
- member: get the details of a team mate
- fakeusers: create some fake users
- fakeevents: create some fake events
By organising these actions, Seneca makes it much easier to maintain and extend your code base over time. It’s easy to for new coders to answer the question: “where do I find the code that does X?”
At nearForm, we’ve been working on Seneca in collaboration with others for over two years, and we use it for all the production Node.js projects we build for clients. As a consulting company we needed a way to avoid rewriting the core business logic of an app each time. This includes things like database interactions, user management, caching, permissions, data editing, payments, shopping carts, etc. We’ve picked out some of the great ideas in Django and Rails, and provided them in a Node.js friendly way.
To enable all these functionalities to work together, you need a common data model to represent persistent data. Seneca provides a very simple data entity model that supports single collection (or table) operations using an ActiveRecord-style pattern. Except, there’s no model logic, and no relations. Turns out you don’t really need either!
The key architectural idea that makes this work is pretty simple. Business logic actions are simply operations that take in some JSON, do some work, and, optionally, return some JSON. All the business logic in an app can be expressed in this way. For example, the createevent action takes in an object that specifies the name of an event, and the number of teams. It then creates the database entries to set up an event. And then it returns the event object.
Registration of a user is another example. Send in the username and password as properties of an object, get back the user data entity. For the Well app, you need to customize this, by adding a property to store events. Seneca lets you completely separate the generic user registration code from the custom app code. You do this by overriding the standard registration action, and adding your own additional logic. You then call the standard action to complete the registration (you don’t have to rewrite it!). This is not done by rigid class inheritance (or indeed anything language dependent), but purely by pattern matching.
And pattern matching is the idea that makes this work. The choice of action is based entirely on the properties of the input JSON. If there’s an action that likes some of the key/value property pairs, that action consumes the input. This allows you to create custom special cases, and also supports the override behavior.
Understanding the Code Base: The app.js file
This article provides a broad overview of the code of the app, and makes some minor simplifications for the purposes of explanation. The source code on GitHub contains very detailed line-by-line comments explaining all the details.
This app is a traditional express app, and you can use any of the express plugins and examples. It’s useful to be able to run your apps in development versus production mode. You can expose debugging data in development mode and turn it off in production. For this app, development mode also means that you’ll use an in-memory database, which is wiped and rebuilt each time you restart, which is very helpful for testing and debugging.
To run in development mode, use the command line (–env=development), or an environment variable: NODE_ENV=development. The optimist module makes parsing the command line really easy:
var argv = require('optimist').argv
var env = argv.env || process.env['NODE_ENV']
This code also uses the Value || Default JavaScript idiom. It means: if the command line argument is not defined, use the environment variable .
Next, you set up the Seneca plugins. Seneca is not a monolithic framework. You compose apps based on what you need. The plugins are focused on an integrated set of business logic that lets you build minimum viable products — things like user management and permissions. You’ll use ordinary Node.js modules for everything else.
The Seneca module exposes a function that you call to create a new instance. This is the same way that express or connect work. You then call the use method to bring in the plugins that you need. These are mostly separate npm modules that you’ll need to put in your package.json. Seneca plugins are loaded on demand, so you just refer to them by name.
First, you create the instance and load some configuration options. This code requires in the Seneca module (which is a function), and then immediately calls to create a Seneca instance. The options are loaded directly from a file in the current folder called options.well.js (this is the one you created in the instructions above).
var seneca  = require('seneca')()
seneca.use('options','options.well.js')
Next you need to define the datastore. If in development mode, just use the built-in memory store. This includes a debugging option to dump the entire contents of the data into the web browser if you visit http://localhost:3333/mem-store/dump. Very useful when sense checking your data structure! Otherwise, if you’re not in development mode, use MongoDB, with memcached caching.
Seneca can use many data stores, both NoSQL and SQL, see senecajs.org/data-entities.html for more details. Seneca can even use different data stores for different data entities, at the same time. And you can even change data stores later, with no code changes.
Seneca is mostly a light-touch framework, in that the basic functionality is deliberately minimal. However it does help to have a common data model so that different plugins can talk the same language about data. It also means that your business logic code remains exactly the same when you swap databases.
if( 'dev' == env ) {
 seneca.use('mem-store',{web:{dump:true}})
}
else {
  seneca.use('mongo-store')
  seneca.use('memcached')
  seneca.use('vcache')
}
Then load up the rest of the plugins. The seneca-user and seneca-auth plugins provide user account functionality, so that users can authenticate with Twitter. The Seneca framework has a set of “standard” plugins that are all prefixed with “seneca-“. You can drop this prefix as a convenience when loading them.
seneca.use('user')
seneca.use('auth')
There’s also a data-editor plugin (inspired by Django Admin), which gives you a little admin web-app for editing your data. To secure this app, you need the permissions plugin to block access to data entities if you’re not allowed to view and edit them.
seneca.use('perm',{entity:true})
seneca.use('data-editor')
Finally, load up your own business logic. This is in a separate file, well.js in the same folder as app.js — we’ll look at this code next. You define your business logic as a plugin so you can get all the Seneca goodness. Here, you set the fake configuration option to true if you are running in development mode.
seneca.use('well',{fake:'development'==env})Once you have Seneca setup, the rest is just standard Express code:
var express = require('express')

// create an express app
var app = express()
app.use( express.cookieParser() )
app.use( express.query() )
app.use( express.bodyParser() )
app.use( express.methodOverride() )
app.use( express.json() )
One thing that you will need is a scalable session manager. You need this to run the app on more than one machine. The specific functionality that requires sessions is the Twitter login, as the underlying implementation module, passportjs, uses sessions for the OAuth HTTP request flow.
This app provides a simple session store example backed by Seneca, that puts the session data into MongoDB as just another collection. This approach keeps the scope of this article contained. If you go deep on Seneca data entities (senecajs.org/data-entities.html), you’ll realize that this code can also use Redis as the underlying session store with a few extra lines of configuration, and again, no code changes.
app.use( express.session({
  secret: 'CHANGE-THIS',
  store: seneca.export('well/session-store') }) )
The seneca.export method allow plugins to export arbitrary objects so that calling code can use them.
And now you need to integrate Seneca with express. This is the line of code the does that. Seneca exposes all the end points of all the plugins as a single middleware function – in the standard form function(req, res, next). You’re using express in this codebase, but any web server framework that accepts middleware functions could also be used. The built-in web plugin exports the middleware function with the export name ‘web’:
app.use( seneca.export('web') )Now all you need to do is serve the static files, and starting listening on the configured port:
var options =seneca.export('options')
app.use(express.static(__dirname+options.main.public) )
app.listen( options.main.port )
The port number comes from the configuration options. The built-in options plugin exports these under the export name ‘options’.
Seneca provides a unified logging format for plugins, so it’s handy to use it here as well. This line of code is the most important in the app.js file. It let’s you know everything is OK, and which port number the app is listening on.
seneca.log.info('listen',options.main.port)
})
Understanding the Code Base: The well.js file
Again, this is a broad overview, and the source code itself is heavily commented in detail. The well.js file implements a Seneca plugin. Seneca plugins are just a set of actions that match certain JSON documents. For logging and human brain grokking purposes, plugins have names, but all they really are is a set of actions. Any plugin can define any pattern to match against. Plugins tend to build up functionality in layers by overriding previously defined patterns.
To define a plugin, just provide a function that takes one argument, an options object. Plugin definition functions are synchronous — they do not have callbacks! Asynchronous initialization is handled by a Seneca action — more on that below. Here is the start of the well plugin:
module.exports = function( options ) {
  var seneca = this
  var name = 'well'
The context object (“this”) of any Seneca action function is the current Seneca instance, and this convention is carried over to the plugin definition function as well. The current Seneca instance contains context specific logging meta data (and a few other things). At this point, you can also take the opportunity to store the name of the plugin in a local variable.
Next you need to provide some option defaults. Often, your options are deeper than just one level of key/value pairs, so the standard extend function of underscore is not sufficient to handle this. You’ll end up deleting some of the defaults. Seneca provides a deepextend utility function to handle this for you:
options = seneca.util.deepextend({
  numcards: 52,
  numteams: 4,
  teamnames: ['Red', 'Orange', 'Yellow', 'Green', 'Blue', 'Indigo', 'Violet']
},options)
The options plugin that was used in the app.js file provides options to each subsequently loaded plugin. You can also just pass them in directly as the second argument to seneca.use, if you’re using your own configuration approach.
The next thing you need are some data models to load and store data entities:
var teament  = seneca.make('team')
var eventent = seneca.make('event')
var userent  = seneca.make('sys/user')
Your own ones are team and event, used for the business logic of the app. The seneca-user plugin defines the sys/user entity. This entity is namespaced with ‘sys’ so as not to collide with your own entity names. In the MongoDB database, you’ll end up with collections called: team, event and sys_user.
Although somewhat inspired by the ActiveRecord pattern, Seneca data entities are even simpler. There are no relationships and no model methods. The properties of the data entity object map directly to data fields in the database document or row. There are some persistence operations that are exposed via functions, such as save$, load$, remove$, list$. These are suffixed by $ to avoid collisions with your own property names.
Now you can add some actions to Seneca to define your business logic. You do this using the seneca.add function, and you give it a pattern to match, and a function to execute if the pattern matches. It’s a good idea to list all the patterns in one place, and define the functions afterwards. This effectively documents the business logic you are providing to maintenance coders (or yourself, six months later!). You’ll recognize most of these actions from the previous section:
seneca.add({init:name}, init)

seneca.add({role:name,cmd:'whoami'},whoami)
seneca.add({role:name,cmd:'leader'},leader)
seneca.add({role:name,cmd:'members'}, members)
seneca.add({role:name,cmd:'well'},    well)
seneca.add({role:name,cmd:'member'},  member)

seneca.add({role:name,cmd:'createevent'}, createevent)
seneca.add({role:name,cmd:'joinevent'},   joinevent)

if( 'dev' == options.env ) {
  seneca.add({role:name,dev:'fakeusers'},  fakeusers)
  seneca.add({role:name,dev:'fakeevents'}, fakeevents)
}
The init:<NAME> pattern is special. It gets called for each plugin (if the pattern is defined), in series, in the order plugins are loaded. This gives you a chance to do asynchronous, order dependent set up, such as connecting to databases. The seneca.ready callback will only be called after all plugin init actions complete. You aren’t restricted to one round of initialization, you can load plugins and wait for the ready callback multiple times.
Once an action has been added to the Seneca using seneca.add, you can invoke it with seneca.act. Here’s an example of invoking the leader action:
seneca.act( {role:'well', cmd:'leader', event:event }, function(err,result) { … } )The input JSON (as represented by a JavaScript object) is matched against the set of patterns already registered. In this case, there’s an action that matches role:well, cmd:leader, so that gets executed. The event property is just a additional argument. The role and cmd properties are not special in anyway — they are simply conventions. The actions that generate fake data, fakeusers and fakeevents, for example, do not use the cmd property.
Because Seneca allows you to customize and extend plugins simply by adding new actions that match or narrow existing actions, most plugins follow the convention of namespacing their actions with a role property. This keeps separate plugins separate, but allows related plugins to extend each other.
The main body of the well.js file concerns the business logic of the app. We’ll take a closer look at one of the actions and then summarise the rest. The source code contains detailed comments within each action, so you can read them line-by-line to understand each one.
The createevent action creates a new event. It is used by the create-event.js script, which you can run to create new events, like so:
$ node create-event.js --name Foo --code foo --numteams 4Each action function has two parameters, the arguments passed to the action, and a callback to provide the results, if any. The name, code and numteams arguments are passed into the action by the script.
function createevent( args, done ){Before creating a new event, you should check to make sure it does not exist already. Search for an event with the same name using the eventent data entity object. If the event exists the load$ action result will be the event data entity, otherwise it will be undefined.
If the event exists, you just call the callback right away with the loaded event, and return, preventing further code execution.
eventent.load$({name:args.name},function(err,event){
  if( err ) return done(err);
  if( event ) {
    return done(null,event)
  }
If you do need to create a new event, use the eventent object to create a new instance of the event data entity, using the make$ method. This accepts a list of properties that the new event should have. The following code ensures the properties have reasonable defaults. The use of _.extend on the args variable allows calling code to add arbitrary additional fields for the purposes of customization. However, role and cmd are never going to be custom properties of an event, so they need to be removed with _.omit.
event = eventent.make$(_.extend({
  numcards: args.numcards || options.numcards,
  numteams: args.numteams || options.numteams,
  name:     args.name,
  code:     args.code,
  users:    {}
},_.omit(args,['role','cmd'])))
You can now save the new event. In development mode, this just saves to an in-process memory store. In production, this saves to a MongoDB database.
event.save$( function(err,event){
  if( err ) return done(err);
Once you have an event, you’ll also need a set of teams. This code creates each team in series, using the seneca.util.recurse utility function (you could use the async module or something similar to do this as well).
seneca.util.recurse(
  event.numteams,
  function( index, next ){
    teament
      .make$({
        num:index,
        event:event.id,
        eventcode:event.code,
        name:options.teamnames[index],
        wells:{},
        numwells:0,
        users:{}
      })
      .save$(next)
  },
  function(err){
    done(err,event)
  }
)
And that’s your team created. The business logic for each of the other actions is similar in style and code volume, and is easy enough to follow in the source code.
Once all the Well app specific business logic is defined, you need to integrate your app with the rest of the system. You’ll need to expose a middleware function that express can use to provide your HTTP end points for your API. These are called by the Sencha front-end code.
Before you do that though, there’s one little piece of integration you need to do with the seneca-user plugin. When a user is registered, you need to add an events property to store any events that the user may join. Strictly, you could check for this property in the joinevent action, but adding it as part of registration provides an example of how you customize Seneca actions.
Towards the end of the well.js file, you’ll find a redefinition of the role:user, cmd:register action. This overrides the default registration behavior provided by seneca-user (which creates an entry is the sys_user collection). However the existing registration code is not thrown away. You can access it by calling this.prior in the action code, which is a reference to the function that was previously assigned to this action pattern. This means you can keep the default behavior and just add to it:
seneca.add({role:'user',cmd:'register'}, function(args,done){
  this.prior(args,function(err,out){
    if( out.exists ) return done(err,out);
    var user = out.user
    user.events = user.events || {}
    user.save$(function(err,user){
      out.user = user
      done(err,out)
    })
  })
})
Understanding the Code Base: Serving the HTTP API
The final element of your app is the API that you expose to the front-end code. The built-in Seneca web plugin makes this easy, by matching URL routes to your actions. You may have noticed that the business logic actions of the Well app are written without consideration for the web. They do not know that they will be used in a web server at all!
The seneca-web plugin operates as follows. All request parameters, and body data, is merged into an arguments object. The URL route is mapped to an action. The action is then called with the merged arguments.
The actions assume that they will receive fully formed user and event data entities. This convention keeps your code simple and avoids the need to write lookup logic. However, the inbound web requests only contain identifier strings. You’ll need to write a function that will provide the real user and event data entities for the actions.
As it happens, the user entity is provided for you by the seneca-auth plugin. You’ll find it in the req.seneca.user property of the standard req object provided by express. So you can tick that one off.
The event needs to be loaded by using the event code string embedded in the event URL. This URL takes the form: http://<server>/well/<event-code>/… You can use the eventent data entity to load the event. Once you have the event, you can inject it into the arguments that the seneca-web plugin will call your business logic actions with. The setcontext function towards the end of the well.js file performs this work. The seneca-web plugin will call this function, and provides arguments to facilitate exactly this type of argument preparation. Once the preparation work is done, you can call the act argument to execute the mapped action.
function setcontext(req,res,args,act,respond) {

  eventent.load$({code:req.params.event},function(err,event){
    if( err ) return respond(err);

    if( !event ) return res.send(404);

    args.event = event
    args.user = req.seneca.user
    act(args,respond)
  })
}
Now you need to define your URL to action mapping. You do this by calling the role:web action with a use argument that defines the mapping. The mapping is defined by specifying the URL prefix of the routes, and a pin of the actions that should be exposed. The pin is just an action pattern that matches a subset the actions. In this case, a pin of {role:’well’,cmd:’*’} will pull out all the well plugin actions that have a cmd property in their pattern. This is the list of business logic actions: whoami, createevent, joinevent, etc.
The pinned actions are then mapped to HTTP end points by listing them in the map property. If an action is not present, it won’t be exposed as an HTTP end point. For each exposed action, you can provide an alias (used instead of the name of the action pin in the URL), and you can also specify the HTTP method (GET, POST, etc), and a function to perform any preparation work (setcontext in this case):
seneca.act({role:'web',use:{
  name:name,
  prefix:'/well/:event/',
  pin:{role:name,cmd:'*'},

  map:{
    whoami:{GET:setcontext},
    leader:{GET:setcontext},

    members: { alias:'player/members/:team',     GET:  setcontext },
    well:    { alias:'player/well/:other/:card', POST: setcontext },
    member:  { alias:'player/member/:other',     GET:  setcontext },
  },
}})
You don’t have to use this approach. It is provided by the seneca-web plugin as a convenience for mapping actions to URLs. You can provide you own middleware function in the standard form:
function( req, res, next ) { … }This lets you do things your own way if you need to.
This covers the essentials of the well.js file. There are some additional details in the source code, with comments to explain them.
The structure of this file follows the common convention of most Seneca plugins:
- define option defaults
- define the action patterns
- define the implementation of theactions
- perform asynchronous setup viainit:<NAME>
- optionally, define a HTTP interface
- return plugin meta, including references to any exported objects
When building your app, you break it into a set of actions that can live in one more custom plugins. This gives you the benefits of control and maintainability, as well as deep logging of the business logic in your app.
Scaling Up
The approach described here should be taken as a starting point for scaling up your app on EngineYard. To automate the addition of new servers, you’ll need to use the Chef configuration management system. This will eliminate the manual setup configuration files, and also allow you to tune any server processes by altering their settings.
This article did not address testing at all. Check out the test subfolder of the Well project on GitHub to see how it was tested.
The Seneca framework also enables you to easily break out individual actions and move them to other servers. This is one of the key reasons for using it! For example, you could move the registration logic to it’s own utility server. This is done by delegating the delivery of certain action patterns to secondary servers. Your main application servers then generate HTTP requests against these secondary servers to get work done. These secondary servers can themselves be placed behind load balancers and scaled. This approach allows you to build very scalable systems. The Seneca approach gives you this option down the road, even if you never need it, without requiring code changes. It also means that you can implement parts of your system in other languages, such as Ruby or PHP.
This article has given you a complete overview of the deployment of a reasonably complex Node.js app to EngineYard, and also shows you how to address some of the production issues, such as configuration and caching. The app is fully open source and public domain, and it is intended for use as cut-and-paste template for you to build your own apps. If you run into trouble, just ask me a question on Twitter: @rjrodger!